Pages

Showing posts with label Renovation. Show all posts

10/08/2012

Our new small home

It's finally here - we went over to our new apartment again today to measure some things and take pictures. So, as promised yesterday, I'll try and de-clutter my head and post pictures with our ideas right here.

These are the stairs that lead to our apartment. The grass you can see here is part of our very own garden, which I'll show more of later. Our apartment is the one on basement-level. But since the house is on the hill, this bit of garden is the only thing that reaches our windows. The small window by the stairs is the bathroom window, the bigger one belongs to our bedroom.

Come on in! I'm not a fan of the red door knobs and everything, but our apartment used to be a kindergarten, so we've got a few of those. I initally wanted to have a bench and a huge mirror in the hallway, on the wall you can see in this picture, but we won't have enough room for the bench. I'm thinking of putting a mirror like the DIY window colour mirror in my last post up here. Maybe two small mirrors, we'll see about that!


That's our bathroom (who would've guessed!). We're upgrading from bath tub to shower, and yes, I mean upgrade, not downgrade. Neither of us is a fan of taking long baths and while it can be relaxing, nearly falling down and breaking your neck every time you need to climb out of the bath tub even though you only showered can get really annoying. We'll get rid of the red things in here, they're leftovers from kindergarten-times as well as the balloons on the tiles. Those will stay though, simply because we don't want to go through painting tiles again. Especially since they're shiny and white this time, not yellowish. We're moving all the things we had in our current apartment to this one, since we -just- renovated it all and bought/built new furniture, so we're not going to buy new things again.


That would be our bedroom. Yes, it looks bad, but that's only because the landlord hasn't put the wooden floor in it yet. Afterwards, it will look just awesome. We can look straight into our garden from the bed, which will be pretty much in the middle of the room. We're getting two twin beds, put together by a nice headboard, most likely made of pallets or something similar. In the lower picture (yes, I know, bad quality but the only one the Doctor took of this corner) you can see the little niche that we will turn into our closet. We're going for something like Martha's solution in my last post, all hidden by a nice curtain hanging from the wall.


Kitchen! Only this picture so far, you'll get the real impression of it further down, together with our awesome living room because this kitchen opens into the living room. We can see straight into our garden from the window. A friend told me that you never rent apartments without kitchens in the States, but over here, that's actually fairly common. We'd preferred to have a kitchen in there as well, but thankfully my parents are helping us out so we can afford to buy our own kitchen. We'll keep it simply and not too dark, since the kitchen doesn't have much space and we don't want it to look even smaller than it is.
On the right side, the side you can't see in this picture, there's a blank, white wall. We're not putting any shelves or the like there because then we couldn't move anymore, but I'll ask my mother and grandmothers whether I can have some handwritten recipes that I can frame and hang there. I saw this on Pinterest once and that's the perfect place to hang them!


Here it is, our wonderful living room. Together with me, super tired because the Doctor's best friend spent the night at our apartment and we were all up until three in the morning. I was taking pictures with my phone to send to friends straight away, so I'm pretty much in every picture the Doctor took. But I think you can still see the awesomeness in this room. There's one more of those huge windows on the right side, the one you can see in the upper picture. Actually, it's the door that leads to our terrace. And you can see the kitchen in the back and - oh yes - the fireplace. I've always wanted to have one of those! Our plans for this room are still a bit sketchy, we might change it up once we've put the furniture down.
So far, it goes along those lines: In the upper picture, there's the small footstool in front of the fireplace - that's where we'll put a bench and our dining table. We're closing the door between kitchen and living room with a counter that reaches as high as your ordinary table does so we can put things down here, for example plates, and use the room on both sides. On the living room side of the counter, we're going to make a little reading nook next to the fire, that's what I really, really wanted and we were worried about not having enough room.
If you look at the lower picture, that's where the actual living room will go. We are keeping our TV table and shelf above it because it's only a year old and too good to throw away. We're keeping our couch as well, but we're upgrading it. It's currently standing against the wall and since it will be in the middle of the room here, we're adding a board to the back for support. It's dark brown right now and I'm going to change that to grey and completely renew the fabric on it. That's going to take a while, but it will be well worth it. I can also use that wall for my gallery project.

Before we move outside, I'll finish up with the two tiny extra rooms we've got in this apartment.
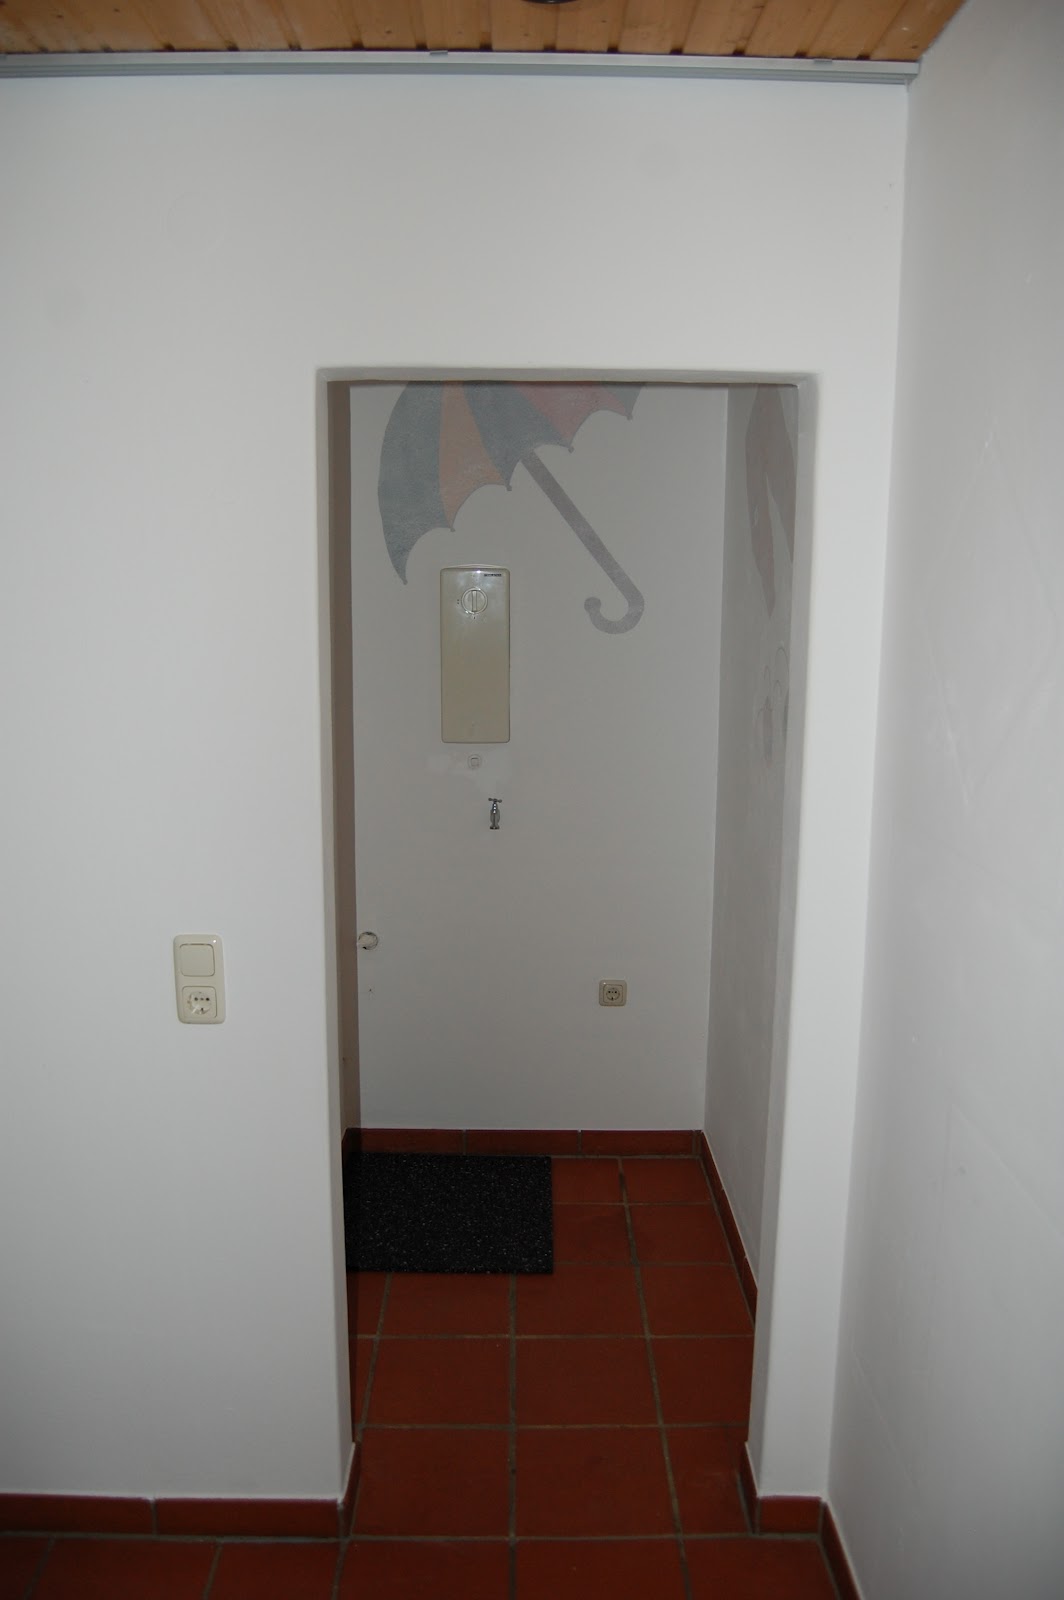


Yep, they really are tiny. The one in the first picture is for laundry machine and other household items, we're adding shelves there to store all these things as well as things we rarely use but keep on hand. There are paintings shining through, another thing remaining from kindergarten-times. We're going to hide the room behind another curtain so those won't be a problem and if we really find they're too annoying, we can just paint the wall again.
The room on the second picture is meant as a storage room, but this is where the Doctor will keep his music things. It has the exact right size for his desk and he can keep all his guitars there as well. We might also be able to fit a few shelves into it so we have more storage room. Doctor says this is good for the sound, so I'll just go with it and be happy to have more room to put things.

And now.. the outside. Our terrace and garden surround our apartment so we have complete privacy. Combined, garden and terrace have about the same size and level of awesomeness as the apartment itself.


Isn't this great? It's huge! We can build our furniture out there rather than trying to find a spot in the kitchen, as we currently do. We can invite friends over, have barbecues, we could even run a marathon on this terrace! We don't have many plans for this part yet. The Doctor wants to ask the landlord if we could install a roof above a part of the terrace so we can keep outdoor furniture outside without having to fear for rain, dry our clothes, etc. I want to hang a hammock and possible swings from the support beams. I'm also going to try and make some tire-ottomans so we can hang out with friends outside. One thing we'll definitely do - we bought this Super 8 projector at the flea market on Saturday and we're going to use that to watch old movies in black and white one warm summer night on our huge terrace.


And finally, this is our garden. The garden hut belongs to the landlord, but we can use half of it AND we may use his lawn mower and all the other supplies he has in there. The garden continues around the corner towards the entrance, the part you saw in the first picture. The tree in the bottom picture is an apple tree that we may use for ourselves as well. And I can plant vegetables and herbs and whatever I want in there! Suffice to say, I absolutely love this. We're going to keep it furniture-free and use it only for planting and maybe lying on the grass.

I hope you like the apartment and the ideas we have for it. This will all make much more sense when we start moving and furnishing and decorating, I promise. And I can't wait for it!

9/25/2012

Our DIY bathroom

This is going to be a bit of a long post here. I don't have a picture of how the bathroom initially looked like, but this one should give you an idea.


It was bad. And I mean really bad. In this picture, we already ripped off the wallpaper and placed the new cabinet under the sink, but yeah, the rest was pretty much just like it.
As you can see, there's this orange paint that makes sure you don't get mold on your wall. Well, they painted it right on the wall and then added wallpaper, so with wallpaper in the shower, we had mold after a few weeks. We got rid of it again and again, but it looked really ugly because it left dark spots.
We also got a new bath tub after the old one literally rusted through to the point where the water just ran into our downstairs neighbour's ceiling. Instead of either changing all the tiles to white tiles or coating the bath tub in those yellow-ish tiles, they just mixed it up and we got what you can see above. Suffice to say, we weren't happy.

Now, before I moved into this apartment, Dr. Snyder lived there by himself. So he didn't really care much for decoration and things looking pretty, as long as it was good enough to live with, why change much? But after the mold and the weird tiles, he agreed that some things had to be done.

I'm going to show you step by step what we built to make this bathroom better. First, the sink cabinet you can see in the picture above. It was a 6€ IKEA cabinet, rather plain, but fit for our needs. The Doctor made the hole for the pipes a bit bigger so it would all fit and I made sure it looks a little nicer.


I went to the hardware store and bought new door knobs. I wanted them to look a little antique to fit into the new style we had in mind for the bathroom. They were cheap, easy to attach and made it look less plain - just what we were going for.

While I attached the door knobs, the Doctor prepared the new wallpaper for the shower. I helped him attach it and then painted the whole bathroom with latex paint. That way the mold can't return and the old wallpaper on the rest of the walls got white and shiny without having the renew it completely. After that, I cleaned the yellow-ish tiles, put foundation on it and painted them white with this special tile paint that's way too expensive. Luckily, I only needed one coat and the result was great.


We had a small cabinet in that corner (above the sink) that was really old, so we got rid of it. Instead, we bought a big framed mirror and a white wooden cupboard, held up by black cupboard-holder-uppers. In case you haven't noticed so far, I'm from Germany and not a native speaker, so I'm lacking words now and then. But I hope you know what I'm trying to say here! The result turned out neat and clean, we really love it and it was no work at all because there wasn't much DIY going on here.


In the mirror, you can also see our towel-hanger. Also from IKEA because they were having a bathroom-things-sale right when we needed it.

Next on our list was another shelf. In the corner next to our door, there was this huge cabinet that the old lady that used to live in our apartment bought. It had this yellow tint to it and was just too big for the room. So we decided to build our own shelf. We used white boards and more of those black holders, but it all to the right sizes and the Doctor was even nice enough to cut a heart into the back board AND he made me a wooden mustache, that I attached to the bottom. We hung it so I can -just- reach the top, that way we can keep our laundry basket underneath it.


Because I wanted it to look a bit tinier (and nobody has to see tampons and whatnot in my shelf), I went back to the hardware store with the measurements and luckily found those wooden boxes they sell for 2€ each in the perfect size. I didn't want them to just look woody and plain though and being a bit of a geek, I used a meme theme for them.


After that, we took a bit of a break before we renewed the floor and the toilet seat. We hung the shower curtain and then it looked like this.


Now, you can see the toilet seat in this picture. And I'm sure you'll understand that... well, let's just say it didn't quite go with the new style of the bathroom. I had something really special in mind for that one, but first we got our new toilet paper holder. And newspaper holder. A fusion of both even! The Doctor likes his crossword puzzles, so I bought him this neat little thing on Amazon.


And then, after weeks and weeks of waiting (we had the toilet seat sticker custom made), it finally arrived. Our new, awesome and unique toilet seat. And even though we've had it for a month or so now, I'm still absolutely in love with it.


I needed something funny that went with the theme of the bathroom and this was just perfect. And with that little toilet seat, our bathroom was finally finished. It's sad now that we have to move into a new apartment, but it was definitely worth the effort!

A little extra here: While the Doctor was on tour with his best friend, I added another piece to our bathroom. It's not permanent (I did use lots of sticky tape, so it's semi-permanent), but it definitely made them laugh.


How to turn a small ugly balcony pretty

Oh Christmas tree, oh Christmas tree... For nearly three months, you've been living on our balcony. No matter the weather, you seemed to enjoy that small space just for yourself.

Well suck it, the balcony's mine now. Have fun in the trash can.

Unfortunately, getting rid of an old Christmas tree doesn't necessarily make a balcony much prettier. Not if said balcony basically consists of poorly spread concrete and a rail that looks like a rusty old can with holes in it.

But don't despair, with a bit of imagination, anything's possible.

First of all, the rest of the "things I might want to use again but actually I don't so I just let them R.I.P on my balcony" your man might have left on the balcony before you moved in need to go. That might be lots of bottles that bring you some money. It might be an old cat toilet. It might be buckets of paint you *could* have used to paint things for your balcony - if they hadn't been sitting there for over a year.

Once all that stuff is gone, the real adventure begins. Two square meters for two people isn't exactly much space. And you want ALL THE THINGS. I know you do. A table would be great for all the things like eating, reading, painting, writing or slicing cucumbers. Whatever floats your boat. Then, of course, chairs might be nice, because you definitely don't want to be standing while you slice said cucumbers. But a naked balcony with nothing but a table and two chairs, that wouldn't look pretty and you wouldn't want to use it. So you want flowers, candles, water, a parasol and maybe a cage for your pet crocodile. Again, whatever *you* want and need.

Now, one day I might actually build a crocodile cage, just for the giggles. But for now, I have a few different ideas.

A table! What do we need the table to be? Small. Basically, it shouldn't even be there, unless you really need it. Especially not the table legs, there's not much room to put *your* legs anyways. We can't really make the table float all on its own and if you want it to at least hold a cup of coffee, there should be some kind of table leg to support it. What seems like a nearly impossible task is actually pretty easy when you think about it.
What do we need for it? Wood, lots of wood. You can use a small flock as a table leg and a simple board as the table top. Of course, you can also use your creativity here. We bought a wooden floor tile, 50x50cm from the hardware store, simply because it was cheaper than building it ourselves. With a piano hinge and a small wooden board we attached the table top to the rail. On the ground, we used another small piece of wood on one side of the railing, a hinge and the flock for our table leg. Then comes the tricky part, especially if you have nothing to measure the length of the table leg. You need to cut the flock to the exact length you need for the flock to get stuck under the table (You can also secure it with a screw or the like) and the table to be exactly even. You wouldn't want your coffee to run right out of the mug, would you?
Of course, I have some pictures so you can actually see what I mean!


Flowers! Putting up flower pots all over your balcony takes up a lot of space that you need for your table and chair. But there's a solution! Simply hang your flower pots from the rail, the walls, the balcony above yours (you might want to ask your neighbour here). Now, if your balcony is only two square meters "big", I assume you don't want to spend all your money on pretty flower pots. Again, there's a solution! You can buy the cheap pots and make them prettier. Buy a white plastic pot and paint it! If you're talented with painting, you can use a brush, some paint rests (or new paint, if you want to buy it) and let your creative juices flow. Not too much though, the neighbours might be watching. Or you make yourself a stencil and use spray paint. You can either leave the white plastic as a base colour or you use two colours. For our pots, we used green and gold, as seen here:


There are currently no flowers in there, as the two pots that look like this are the new homes for some kitchen herbs! That way you can have green stuff on your balcony, use it for tasty food AND avoid all the bees that flowers normally attract.

Of course, you can use smaller pots as well! There are round pots with hooks as well, in our case those are metal pots. They're not very pretty, but not exactly ugly either, so I just decorated them with some beads for a little bit of GET PRETTIER.


Granted, once you've put flowers in those pots, the beads will most likely disappear behind them, depending on the size of the plant. But you can still see it through and it's a nice little detail. Of course, you can also put up a small vase with some freshly cut flowers - that way it's not a constant part of your balcony furniture, but you can put it there whenever you have flowers - and if you need the space, you can just put them inside. They're pretty no matter where they stand. Now, to the next step! 

Candles! Of course, you most likely want some decoration, too. Candles on a balcony are a bit tricky. Wind can easily blow them out, so you need to get a little creative here. I simply used old marmalade glasses so the candles are save! A marmalade glass with a candle inside all on its own looks a bit weird though. So I used white stones to fill the glasses up a bit before placing the candle on them. For the outside decoration of the glasses, I used the same beads as above, because I bought them in a huge package. I tied them to the glass with some wire and used a pincer to twirl them so they won't open again. The results are shown below!


But of course, a day only has so many hours and since our neighbours would give us hell for working on our balcony on Easter, we enjoyed our breakfast on our almost-pretty balcony today. Stay tuned for Part II, including a white fence to avoid the curious stalkers next door, a way to cover the ugly concrete, light sources, more outside-suitable decoration and whatever else comes to my mind while we're working on finishing our project!